


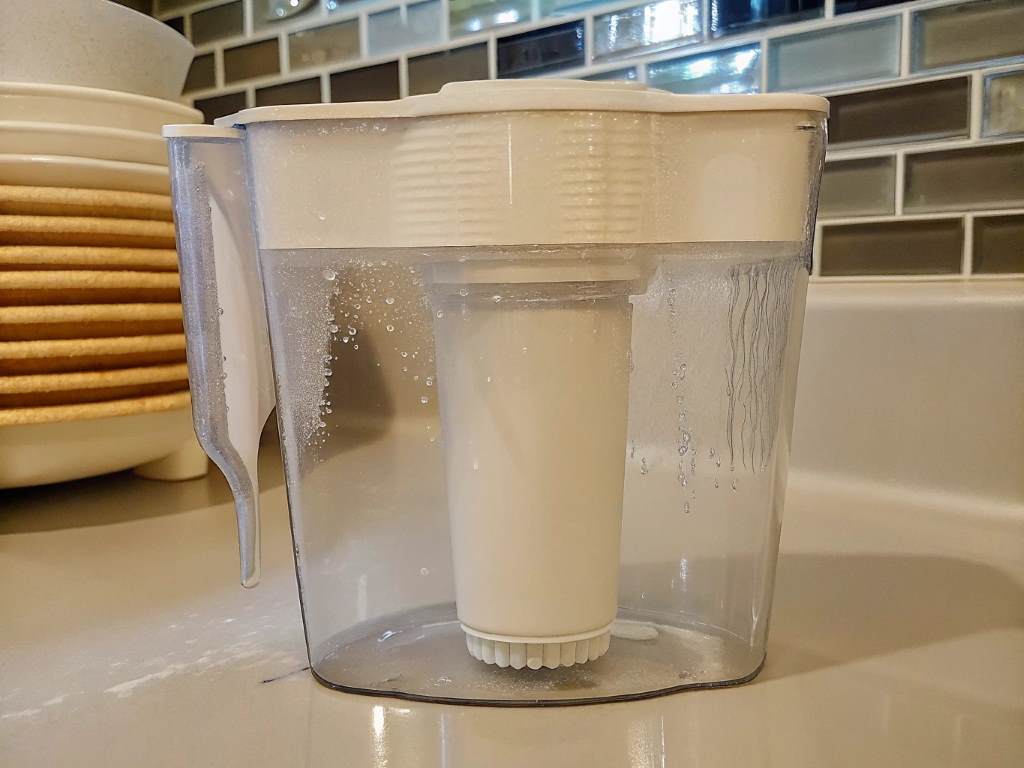
Last summer, I noticed a small puddle under my water filter pitcher. At first, I ignored it, thinking it was just a spill. But the puddle grew, and my frustration did too. A leaky pitcher isn’t just annoying—it can waste water, damage surfaces, and compromise filtration. According to a 2021 study by the Environmental Protection Agency, household leaks waste nearly 1 trillion gallons of water annually in the U.S. While a pitcher leak is small, it adds up. Fixing it saves money and ensures clean water. This blog post shares my journey to a leak-free pitcher with practical, SEO-friendly tips. Whether you’re a DIY newbie or a seasoned fixer, these steps will help. Let’s dive in and stop those leaks for good!
Understanding Why Your Pitcher Leaks
Before fixing a leak, you need to know why it’s happening. Water filter pitchers, like Brita or PUR, have complex designs with reservoirs, filters, and spouts. Leaks often occur at connection points. Common culprits include worn-out gaskets, loose filters, or cracks in the plastic. For example, my pitcher’s filter wasn’t seated properly, causing water to seep out. Additionally, overfilling the reservoir can force water past seals, as noted in a 2022 Consumer Reports guide on pitcher maintenance.
Temperature changes also play a role—hot water can expand seals, while cold water can shrink them, loosening connections. Inspecting your pitcher closely is key. Check for visible cracks, loose parts, or damaged seals. Understanding the cause helps you choose the right fix, saving time and effort. This step is crucial for long-term success, so don’t skip it.
Tools and Materials You’ll Need

Fixing a leaky pitcher doesn’t require a toolbox full of gadgets, but having the right supplies makes the job easier. Based on my experience, a few household items can do the trick. Here’s what you’ll need:
- Screwdriver: A small Phillips or flathead to tighten loose parts.
- Food-grade silicone sealant: Safe for water containers, available at hardware stores.
- Replacement gaskets or O-rings: Check your pitcher’s brand for compatible parts.
- Clean cloth: For drying surfaces before sealing.
- Dish soap: To clean the pitcher thoroughly.
- Small brush: A toothbrush works to scrub tight spots.
These items are affordable and easy to find. For instance, food-grade silicone costs about $5–$10, per a 2023 Home Depot pricing guide. If you need replacement parts, visit the manufacturer’s website or trusted retailers like Amazon. Having everything ready saves time and prevents mid-repair trips to the store. Plus, using food-safe materials ensures your water stays clean and safe. Discover Do Boilers Really Boil Water?
Step-by-Step Guide to Sealing Leaks
Now, let’s get to the fix. After struggling with my leaky pitcher, I developed a simple process that worked wonders. Follow these steps to seal your pitcher’s leaks effectively:
Step 1: Clean and Dry the Pitcher
Start by emptying the pitcher and disassembling removable parts. Wash every piece with dish soap and warm water. Use a brush to clean crevices where dirt hides. Rinse thoroughly to remove soap residue, as it can affect sealant adhesion. Dry all parts with a clean cloth. A 2022 study by the Journal of Applied Microbiology found that wet surfaces can harbor bacteria, so drying is critical for hygiene and a strong seal.
Step 2: Inspect and Identify the Leak Source
Examine the pitcher for cracks, loose filters, or worn gaskets. Fill the reservoir halfway and watch for drips. In my case, the filter wasn’t fully clicked in, causing a slow leak. Tighten loose parts with a screwdriver if needed. If the gasket looks worn, replace it. Most leaks stem from these issues, according to a 2023 Brita maintenance guide.

Step 3: Apply Food-Grade Silicone Sealant
For small cracks or gaps, apply a thin layer of food-grade silicone sealant. Use a toothpick to spread it evenly. Let it cure for 24 hours, as recommended by Loctite’s 2023 product manual. This step fixed a tiny crack in my pitcher’s spout, stopping the leak completely. Ensure the sealant is food-safe to avoid contaminating your water.
Step 4: Reassemble and Test
Reassemble the pitcher, ensuring all parts are secure. Fill the reservoir and check for leaks. If water still seeps, repeat the inspection and sealing process. My pitcher needed a second round of tightening, but it’s been leak-free since. Testing ensures your fix works before regular use.
Preventing Future Leaks
Fixing a leak is great, but preventing future ones is even better. Regular maintenance keeps your pitcher in top shape. First, avoid overfilling the reservoir, as excess water stresses seals. Second, clean the pitcher monthly to prevent buildup that can weaken gaskets. Third, store it in a stable environment—extreme temperatures can damage seals, per a 2023 PUR care guide. Additionally, replace filters and gaskets as recommended by the manufacturer, usually every 2–3 months. In my case, setting a calendar reminder for filter changes reduced strain on the pitcher. Finally, handle the pitcher gently to avoid cracks. These habits extend your pitcher’s life and save you from future headaches. According to a 2021 Consumer Reports survey, regular maintenance can double the lifespan of water filter pitchers, making it a worthwhile effort.
When to Replace Your Pitcher
Sometimes, a pitcher is beyond repair. If cracks are large or the plastic is brittle, it’s time for a new one. My first pitcher had a major crack that sealant couldn’t fix, so I upgraded to a sturdier model. Look for signs like persistent leaks despite repairs or degraded water quality. A 2023 Water Quality Association report notes that damaged pitchers can reduce filtration efficiency, risking contaminants in your water. If replacement is needed, choose a reputable brand like Brita or ZeroWater. Check reviews on sites like Consumer Reports for durability ratings. Investing in a quality pitcher saves money long-term and ensures clean water. Don’t cling to a broken pitcher—it’s not worth the hassle.
Conclusion
Fixing a leaky water filter pitcher is simpler than it seems. With a few tools, some patience, and the right steps, you can save money and keep your water clean. My journey from a frustrating puddle to a leak-free pitcher taught me the value of proactive maintenance. By cleaning regularly, inspecting parts, and using food-safe sealants, you’ll extend your pitcher’s life and avoid waste. The Environmental Protection Agency’s 2021 data reminds us that small fixes contribute to big water savings. Now, it’s your turn to tackle that leak! Try these tips and share your experience in the comments below. Did this guide help? Pass it along to friends who might need it.
FAQs
Why does my water filter pitcher keep leaking?
Leaks often come from loose filters, worn gaskets, or cracks. Inspect and tighten parts or apply sealant.
Can I use regular silicone to fix my pitcher?
No, use food-grade silicone to ensure water safety. Regular silicone may contain harmful chemicals.
How often should I replace my pitcher’s gasket?
Replace gaskets every 2–3 months or when worn, as advised by most manufacturers.
Is it worth fixing a cracked pitcher?
Small cracks can be fixed with sealant. Large cracks or brittle plastic mean it’s time to replace.
How do I know if my pitcher needs replacing?
Persistent leaks, poor water quality, or major damage signal it’s time for a new pitcher.


+ There are no comments
Add yours